Google Forms handles event registration well for most events. You can have a form collecting names in about ten minutes, the answers arrive in a spreadsheet you can work from on the day, and Google Forms will now close the form itself when you hit your seat number or your deadline. That last part is new, and it removes the workaround every older guide on this subject still recommends. What is left is the money: there is no way to take a ticket payment on the form.
Quick answer
- You need a form today: blank form, name it after the event and the date, then ask for name, email, ticket or session choice, plus anything you have to know in advance. About ten minutes of work.
- Your event has a capacity: open the Published options dialog and use Set close date or response limit. Google Forms closes registration at your number or your date without an add-on.
- Your event is paid: there is still no payment question. Send people to a checkout link after they register, or build the form somewhere that takes payment on submit.
How do you make a Google Form for event registration?
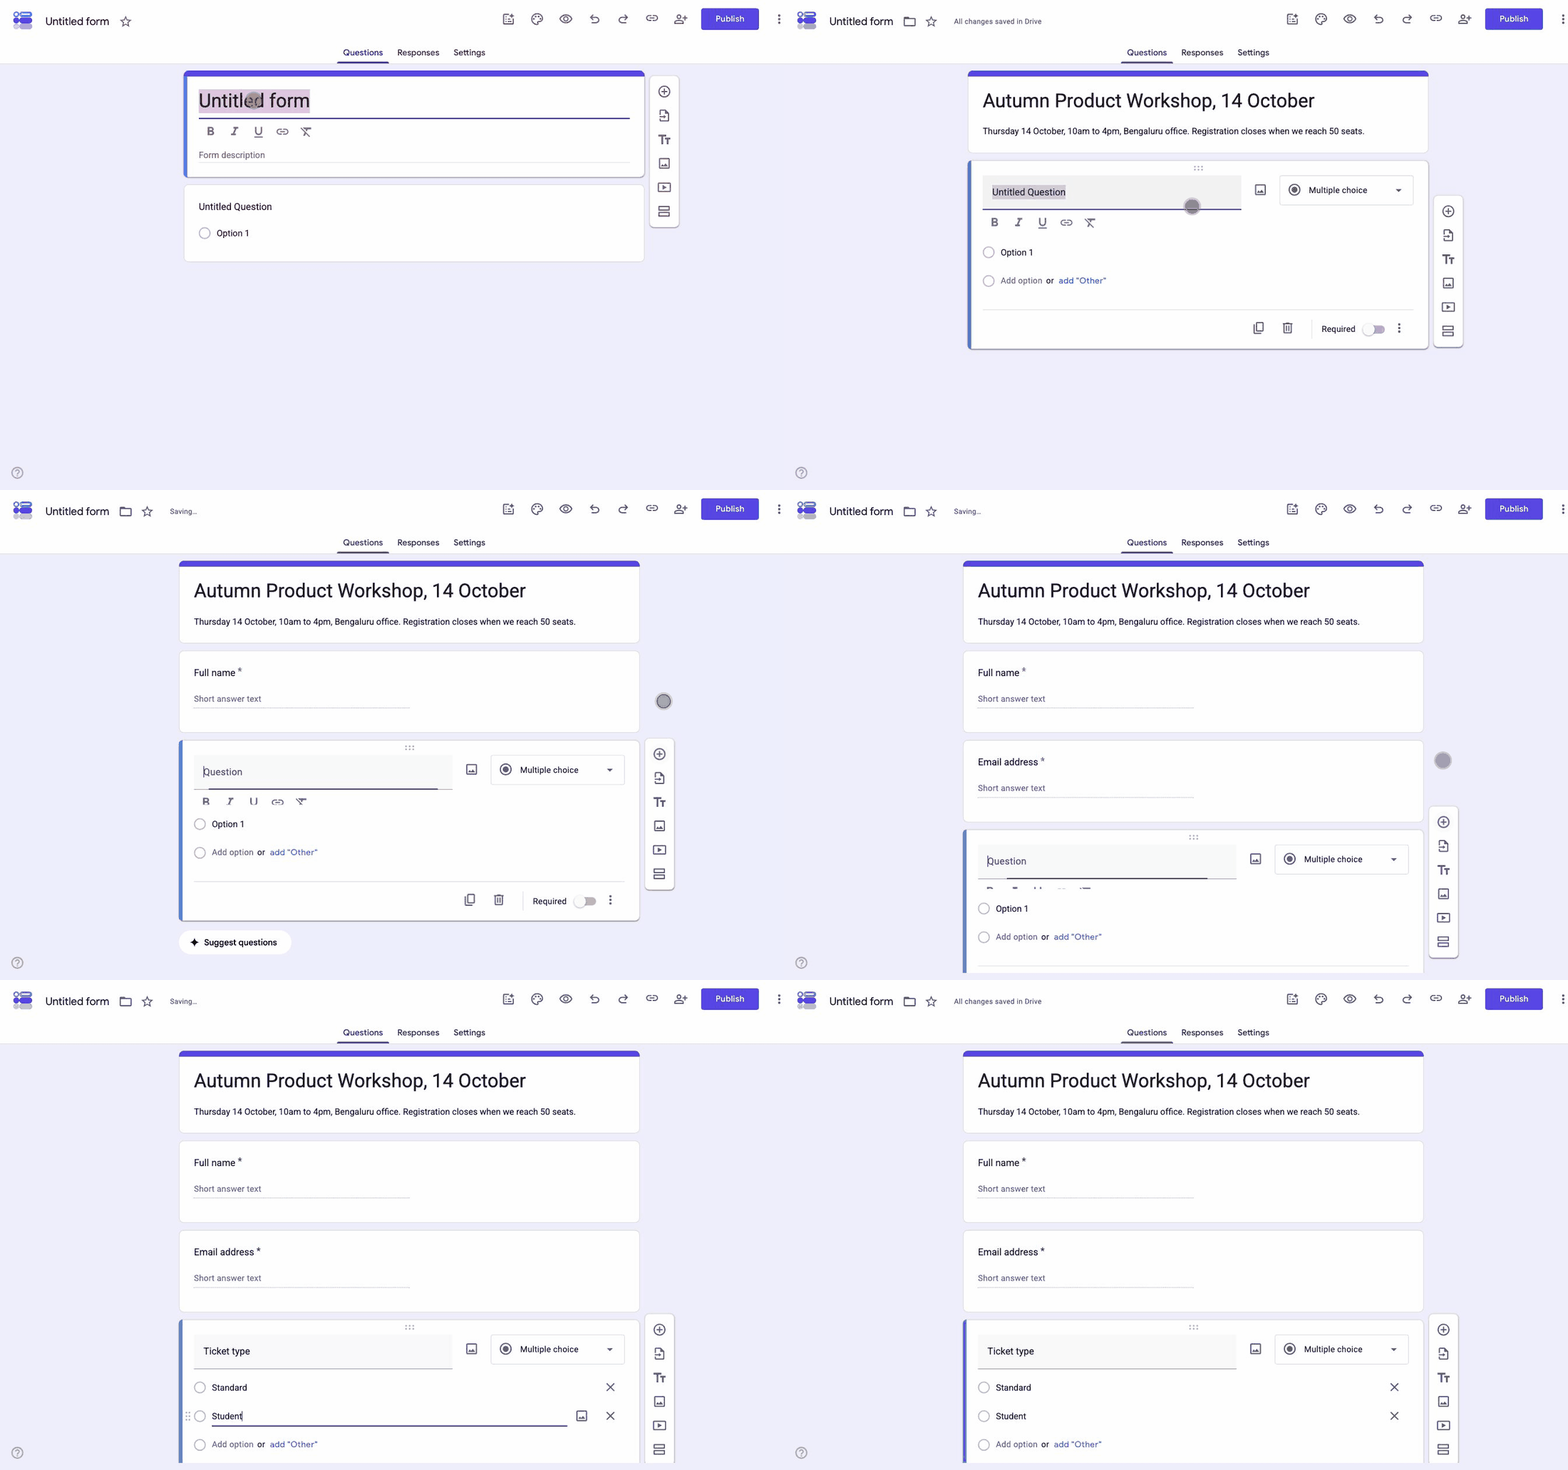
Six steps, and none of them need a paid plan or an add-on.
-
Start a blank form and name it after the event
Open forms.google.com and click Blank form. Name it with the event and the date, for example "Autumn Product Workshop, 14 October". That name is what people see at the top of the form and what you will search Drive for in six months.
-
Put the practical details in the description
The line under the title is the description. Put the date, the start time, the address or joining link and the registration deadline here. Organisers who skip this field answer the same three questions by email all week.
-
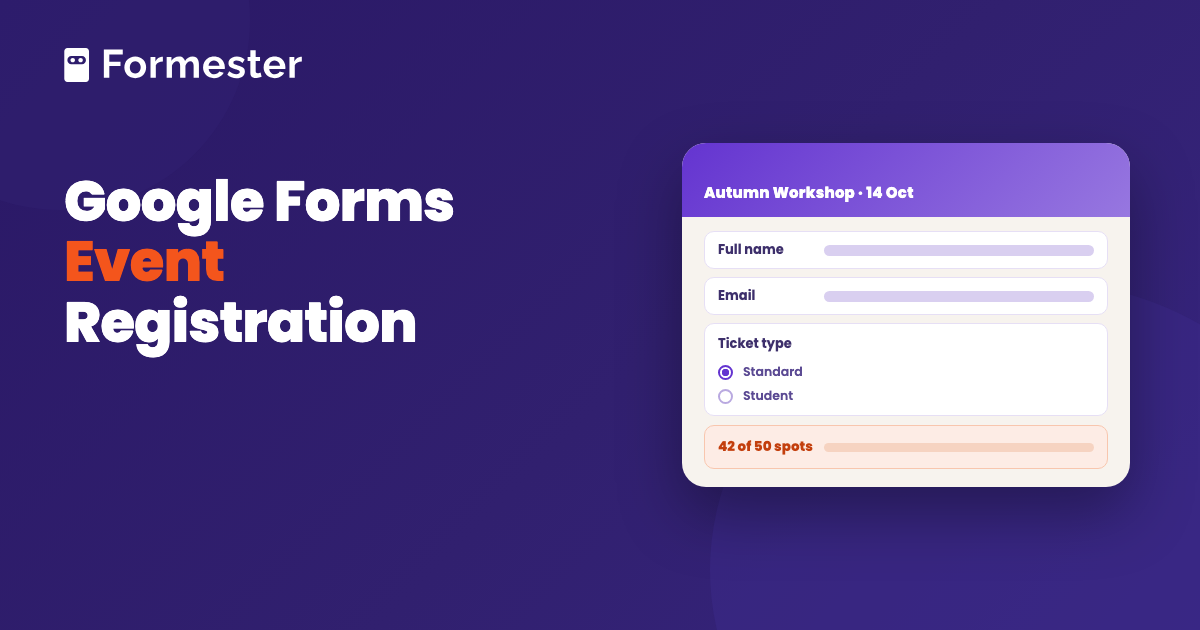
Ask who they are
Two Short answer questions: full name and email address. Mark both Required. If you need to reach people on the day, add a phone number. Leave it optional unless you genuinely will call.
-
Ask which one they are coming to
If there is more than one session, ticket type or time slot, add a Multiple choice question listing them. This one question is what turns a list of names into something you can plan room sizes and catering from.
-
Set the response rules
Open Settings and expand Responses. Set Collect email addresses to Verified, which records the signed-in address, or to Responder input if you would rather people typed one. Turning on Send responders a copy of their response emails every registrant what they submitted, which is the closest thing to a confirmation. Limit to 1 response stops the same person registering twice, with one catch: it sits under a REQUIRES SIGN IN heading, so it loses anyone without a Google account.
-
Preview it on a phone, then publish
Click the eye icon and open the form on your own phone. Most registrations come from a phone, usually from a link in a message. Then click Publish, set the responders to Anyone with the link, and take the link from the Copy responder link panel that opens.
Which questions should an event registration form ask?
Keep it to what you will actually use. Every extra question costs you registrations, and a form asking fourteen things for a free webinar gets abandoned. Here is a list to copy, grouped by why you are asking.
| Question | Type | Required | Why you need it |
|---|---|---|---|
| Full name | Short answer | Yes | The badge, the list at the door |
| Email address | Short answer | Yes | Confirmation, reminders, the recording afterwards |
| Organisation or job title | Short answer | No | Only if the audience mix changes how you run the day |
| Which session are you attending? | Multiple choice | Yes | Room size, catering numbers, materials |
| Ticket type | Multiple choice | Yes | Standard, student or member pricing |
| Dietary requirements | Checkboxes plus Other | No | Only when you are serving food |
| Accessibility requirements | Paragraph | No | Ask on every in-person event, and read the answers |
| How did you hear about this? | Multiple choice | No | The one marketing question worth its cost |
| Photography consent | Multiple choice, yes or no | Yes | If you will publish photos of the room |
Two questions that are usually a mistake: a mailing address, unless you are posting something, and a free-text "anything else we should know" box, which produces a hundred answers you will not read. If you want one open question, make it the accessibility one.
How do you stop registrations when the event is full?
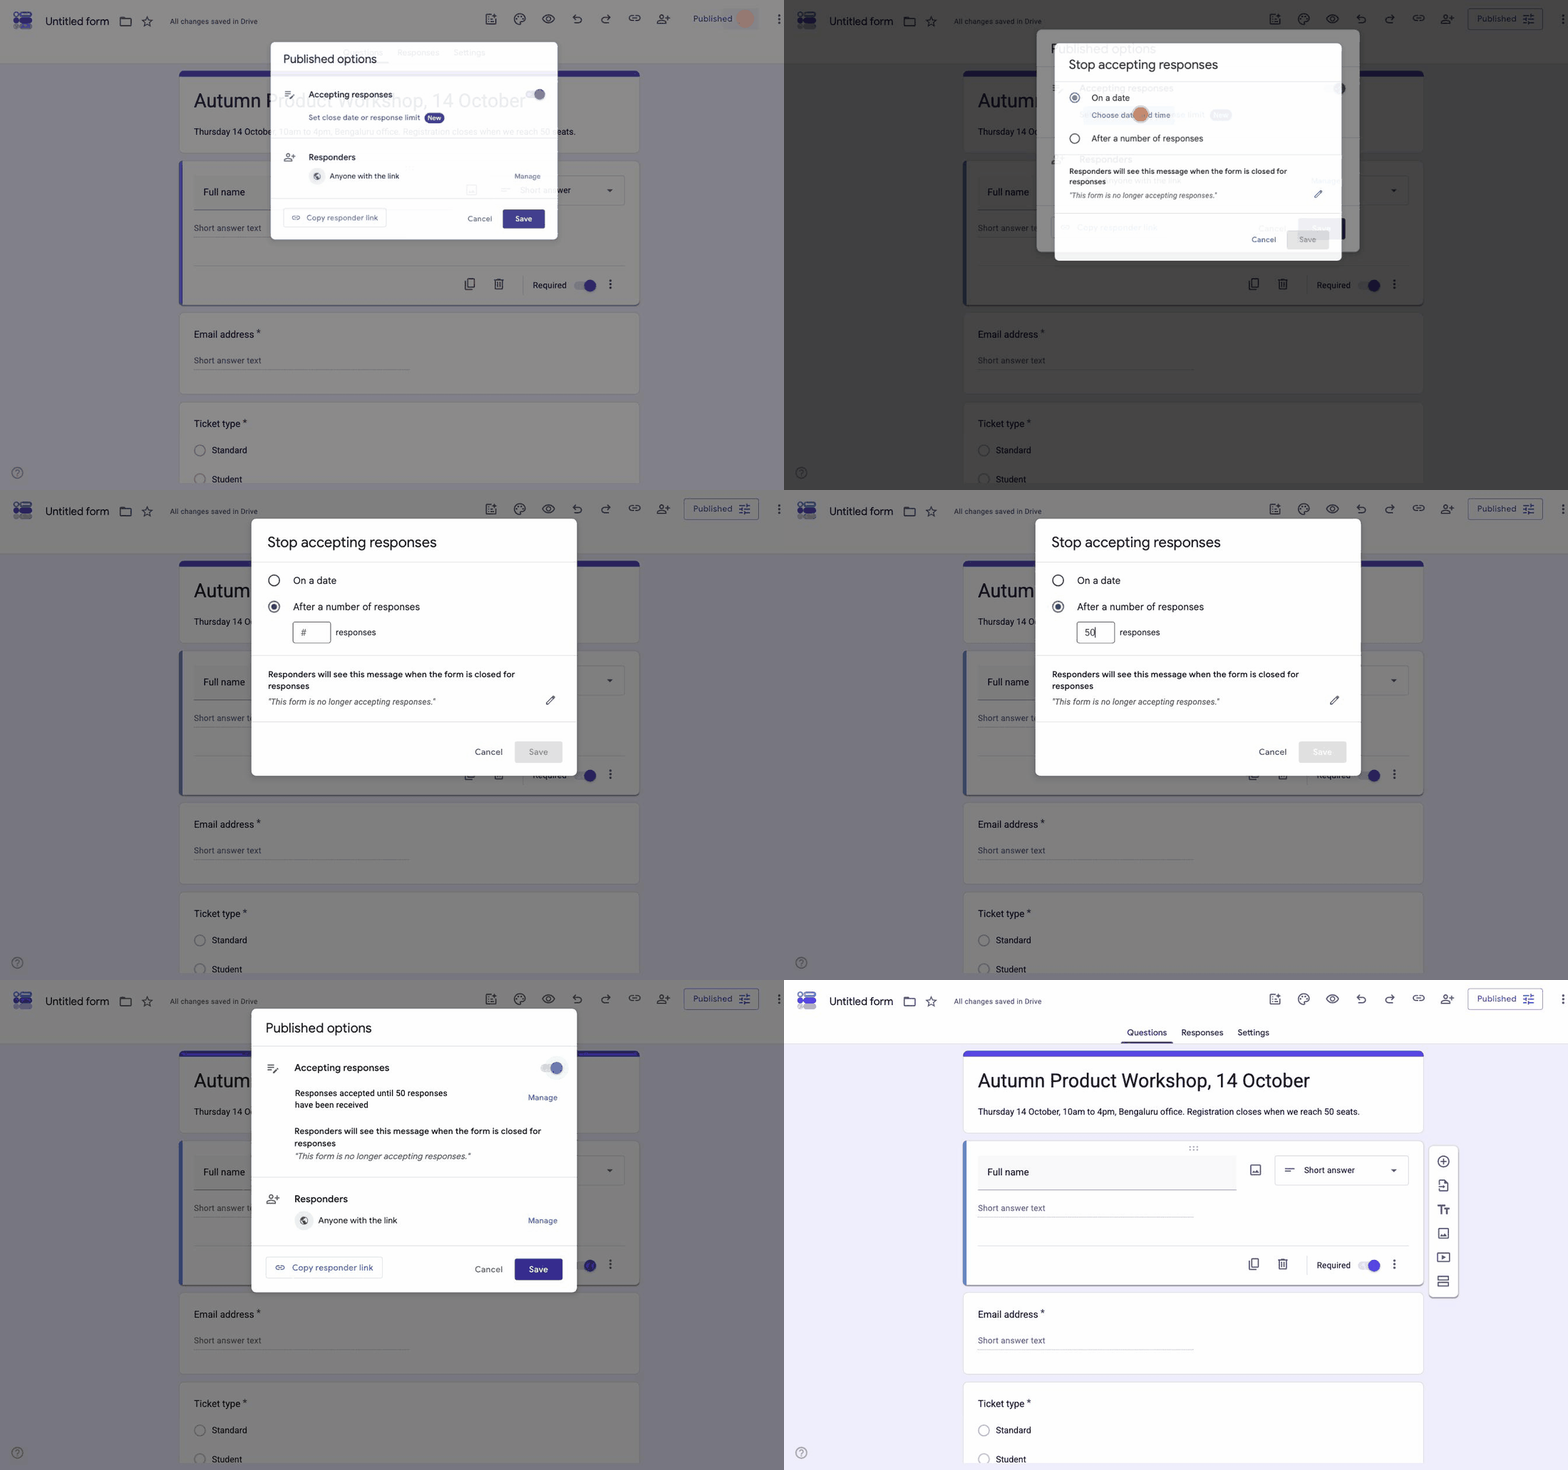
Google Forms will do this for you now. Click the slider icon on the Published button to open Published options, then click Set close date or response limit. The dialog gives you two choices:
- On a date: pick a date and time, and the form stops accepting registrations at that moment. This is your registration deadline, handled without you being at a laptop.
- After a number of responses: type your seat count. Once the form reaches it, registration closes. Fifty seats means typing 50 and forgetting about it.
The same dialog holds the message people see once the form has closed. It reads "This form is no longer accepting responses" by default, and the pencil icon lets you replace it with something more useful, such as a waitlist address. Back in Published options, the confirmation line then reads "Responses accepted until 50 responses have been received", so you can check the cap took.
Two things worth knowing. You can still close registration by hand at any point by switching Accepting responses off in that dialog. And closing a form is not the same as unpublishing it: a closed form shows your message, while an unpublished form shows a blank page, which looks broken to anyone holding your link.
If you have read elsewhere that Google Forms needs an add-on for this, that was true until recently. Our own write-up of the Form Limiter add-on covers that route, and you no longer need it for a straightforward seat cap.
How do you collect payment for a paid event?
This one is still a real gap. Google Forms cannot take a payment, because there is no payment question type, so the money has to happen somewhere else. Three routes, in order of how much work they are:
- A checkout link in the confirmation message: take the registration in Google Forms, then send people to a Stripe payment link or a PayPal.me address on the screen that appears after they submit. Free, and nothing ties a payment back to a registration, so you reconcile the two lists by hand.
- An add-on: a Workspace add-on such as Payable Forms puts a checkout inside the form and charges a fee per transaction on top of your processor's. Worth it when the volume makes manual reconciliation painful.
- A form builder that takes payment: the payment sits on the form, so the registration and the payment are one record. This is the only route where your attendee list is also your paid list.
The full comparison, with the real fees, is in adding payment to a Google Form.
How do you share the form and see who registered?
Publish the form, then take the link from Copy responder link, with Shorten URL ticked if it is going on anything printed. For posters and table cards you want a QR code, which Google Forms does not generate, so that comes from a QR tool or from a builder that has one built in.
On the registration list itself, the Responses tab gives you a live count and a summary of every answer. Click Link to Sheets and choose Create a new spreadsheet to get the attendee list you will actually work from, which you can sort and filter, and share with the person on the door without giving them access to the form. Linking a Google Form to Sheets covers the connection and what breaks it.
One habit worth keeping: share the spreadsheet with your team, not the form. Anyone with editor access to the form can change the questions mid-registration, which is how a required field disappears halfway through a campaign.
What Google Forms cannot do for an event
Straight list, so you know what you are taking on before the registrations start:
- No payments: no payment field, so paid tickets need a second system.
- No ticket or reference number: registrants can get an email copy of their answers, but there is no booking code and nothing to show at the door.
- No check-in: nothing to scan on the day and no attendance record beyond your own spreadsheet.
- No waitlist: when the form closes, the next person reads your closing message rather than joining a queue.
- No reminder emails: Google Forms sends nothing as the date approaches. Reminders are yours to send.
- No QR code: fine for a link in a message, a problem for a poster or a table card.
- Little branding: a header image and a colour, with the Google footer on every form.
For a free internal session, none of that matters. For a paid conference, most of it does.
Where Formester fits
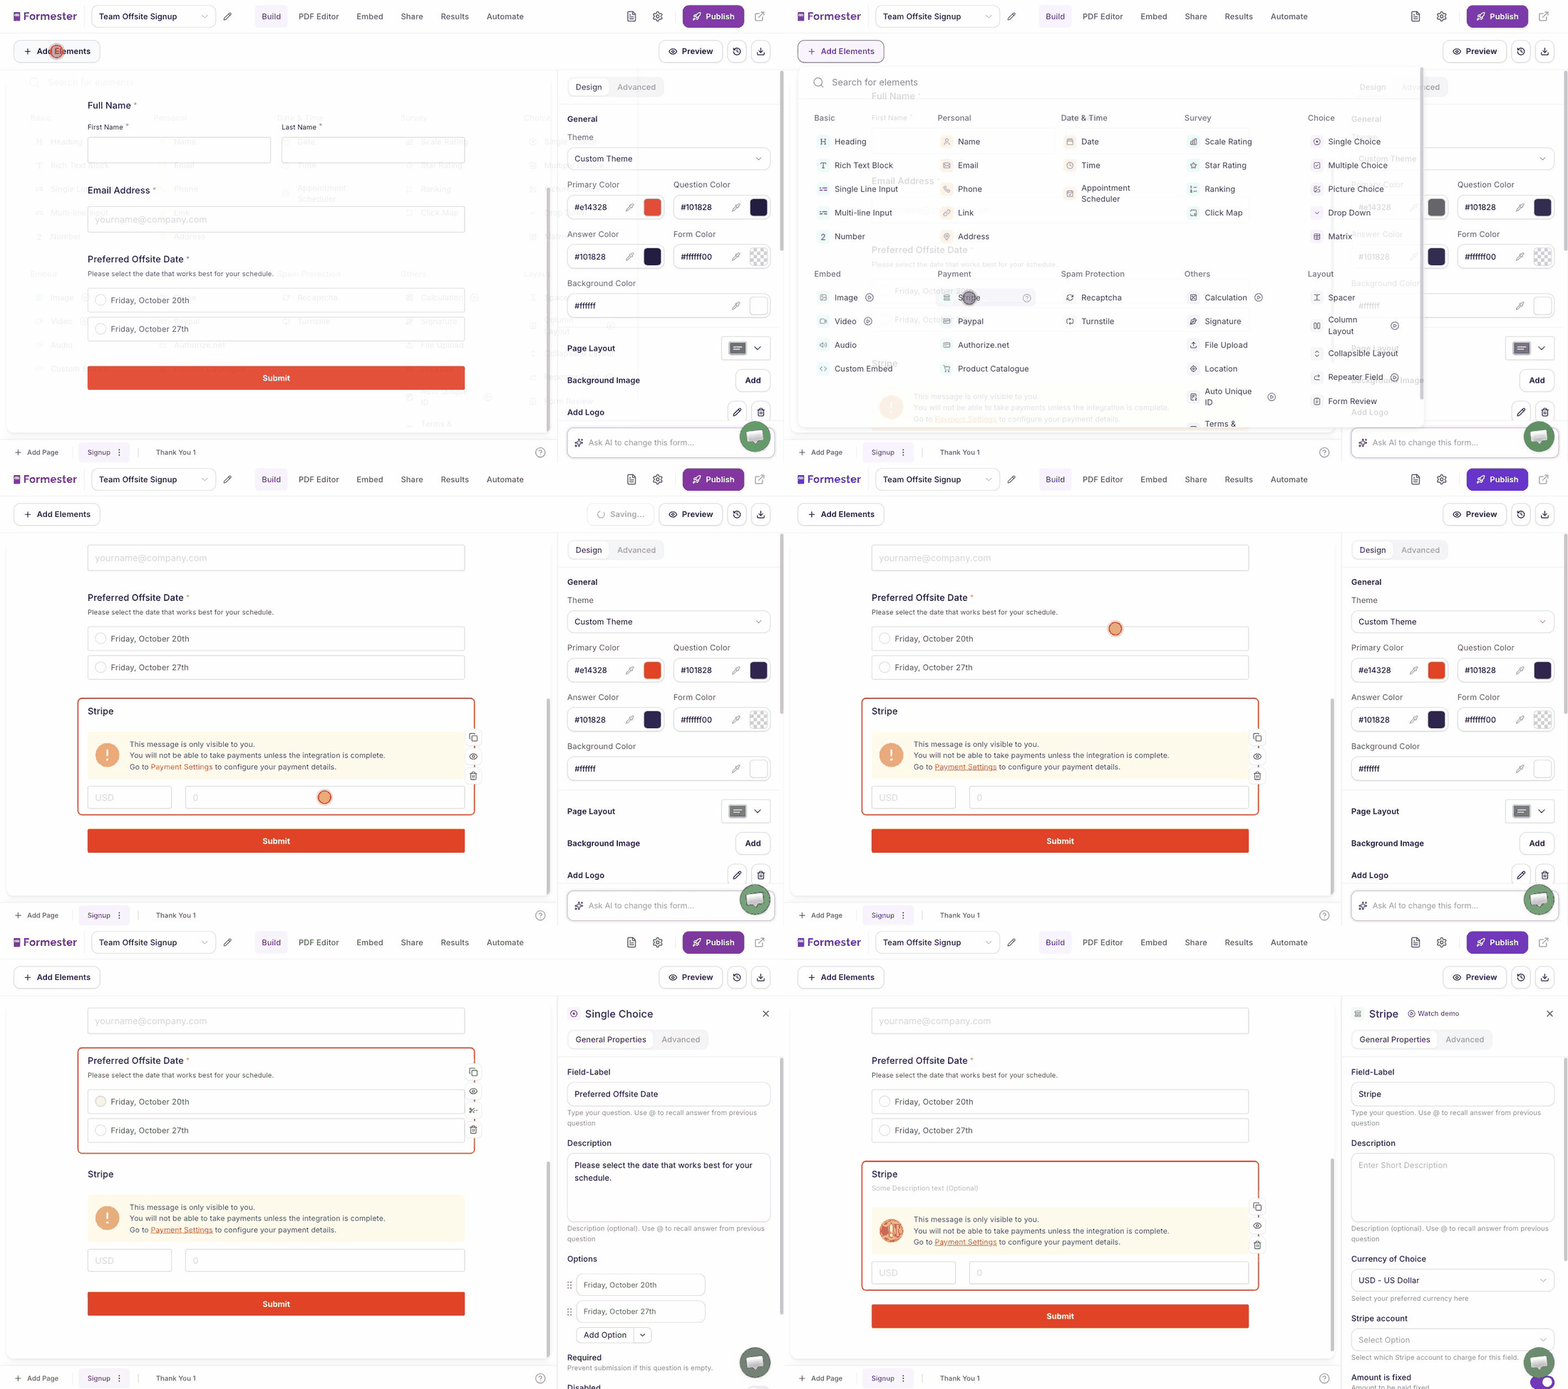
Now that Google Forms closes itself at a seat count, the gap that decides it is the one this page opened with: taking the money.
Online payments put a payment element on the form with Stripe, PayPal or Authorize.net behind it, so people pay as they register and one record holds both the registration and the payment. You pay your payment provider's normal processing fee and nothing on top, including on the free plan. Around that, a QR code comes with every form, downloadable as PNG, JPEG or SVG for posters and table cards, and every response can be sent back to the registrant as a PDF, which is the nearest thing to a real confirmation ticket. Seat limits and open or close windows are there too, through Form Limiter, which is now parity with Google Forms rather than an advantage.
Registration that takes the money on the form
Collect payment as people register, cap the seats, then hand every registrant a PDF confirmation with a QR code for the door.
Try Formester freeFree forever · No credit card · 56,000+ teams
Related reading
- How to make a registration form, if you have not settled on Google Forms yet.
- Create a signup sheet in Google Forms, for slots and shifts rather than tickets.
- Set up online registration for an event, the wider process around the form.
- Event registration form template, if you would rather start from something finished.