
A section in Google Forms is a page. Everything you put in a section shows on one screen, and people click Next to reach the next one. You add sections in Google Forms with the Add section button, then drag questions into them. Once a form has sections, you can also send people to a different section based on an answer, or set where each section goes next. Google allows up to 75 sections in one form.
Quick answer
- You want to split a long form into pages: click the last question that should stay on the current page, then click Add section in the right toolbar. Name the section. Everything below the break is now on its own page.
- You want people to skip to a section based on an answer: on a multiple choice or dropdown question, open the three-dot menu and choose Go to section based on answer. Pick a destination for each answer.
- You want to change the order of sections or remove one: open the three-dot menu on the section header. Move section and Merge with above are there, along with Duplicate and Delete.
How do you add a section in Google Forms?
Creating sections in Google Forms splits a long form into pages. Thirty questions on one page look like a lot of work before anyone starts. The same questions split into pages by topic feel shorter. You can also give each page its own introduction.
-
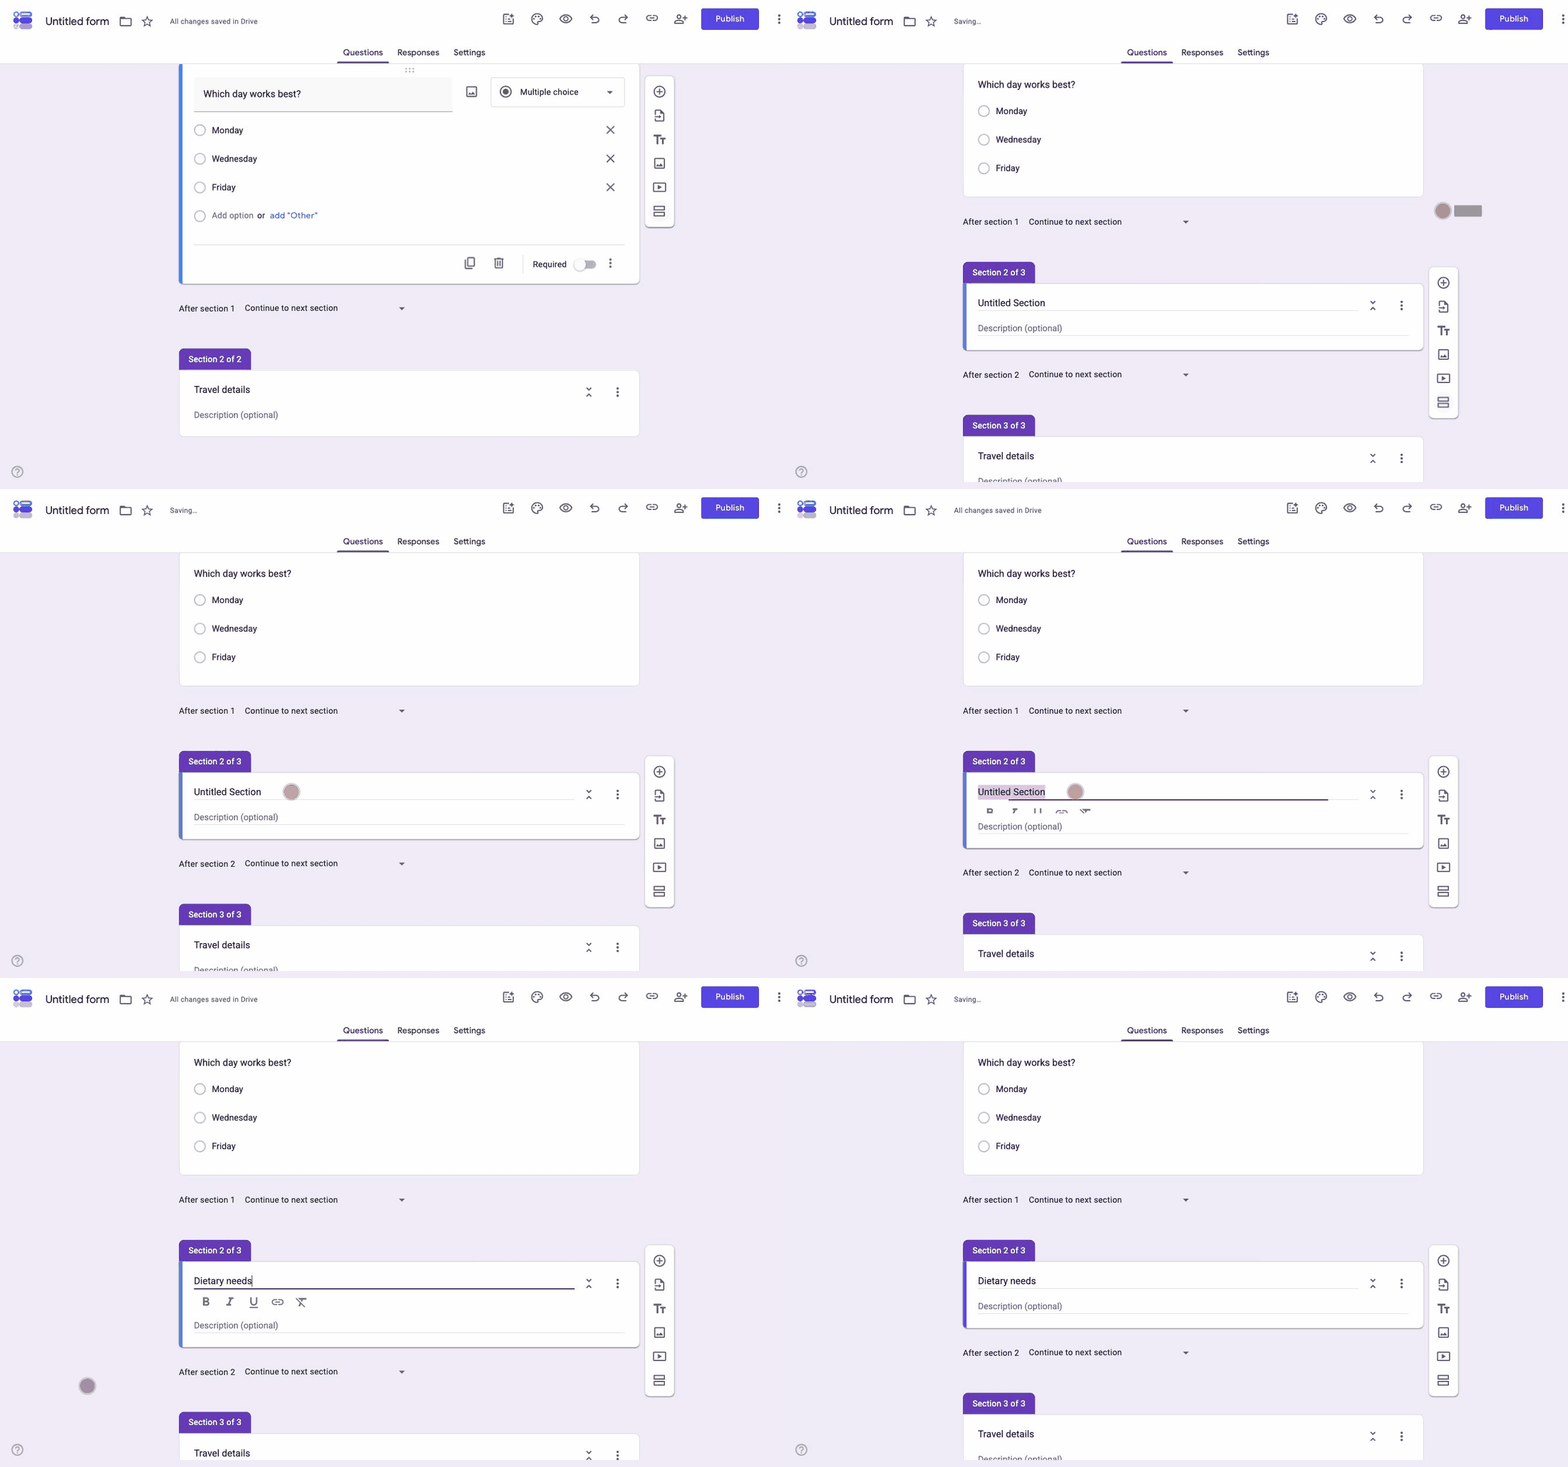
Select the question before the break
Open the form at forms.google.com and click the question that should be the last one on the current page. The new section is inserted right after whichever item is selected.
-
Click Add section
In the toolbar on the right, click the bottom button, Add section. It looks like two stacked rectangles. A new section header appears below the selected question, and every item below it moves into the new section.
-
Name the section
Click the section title and type a name people will understand, such as About your team or Delivery details. The title shows at the top of that page when someone fills in the form. Add a description when the questions on the page need a line of context first.
-
Move questions into it
Drag any question by the six-dot handle at its top into the section you want. New questions you add while a section is selected go into that section. Repeat the steps for each page the form needs.
If you need a group of questions with a heading but not a new page, do not add a section. Click Add title and description in the same toolbar instead. That gives you a heading inside the current page, which is the closest thing Google Forms has to a subsection.
How do you send people to a section based on their answer?
Sections are also how you branch a Google Form. Other form builders call this skip logic. A screening question at the top can send customers to one set of questions and job applicants to another, so nobody answers questions that do not apply to them. Google calls this Go to section based on answer, and it only works on multiple choice and dropdown questions. Checkboxes cannot route, and neither can short answer or any other type.
-
Add the routing question in its own section
Put a multiple choice or dropdown question at the point where the paths split. It usually works best as the only question in that section, so the routing happens as soon as someone clicks Next. For example, a question asking whether the person is a customer or a job applicant.
-
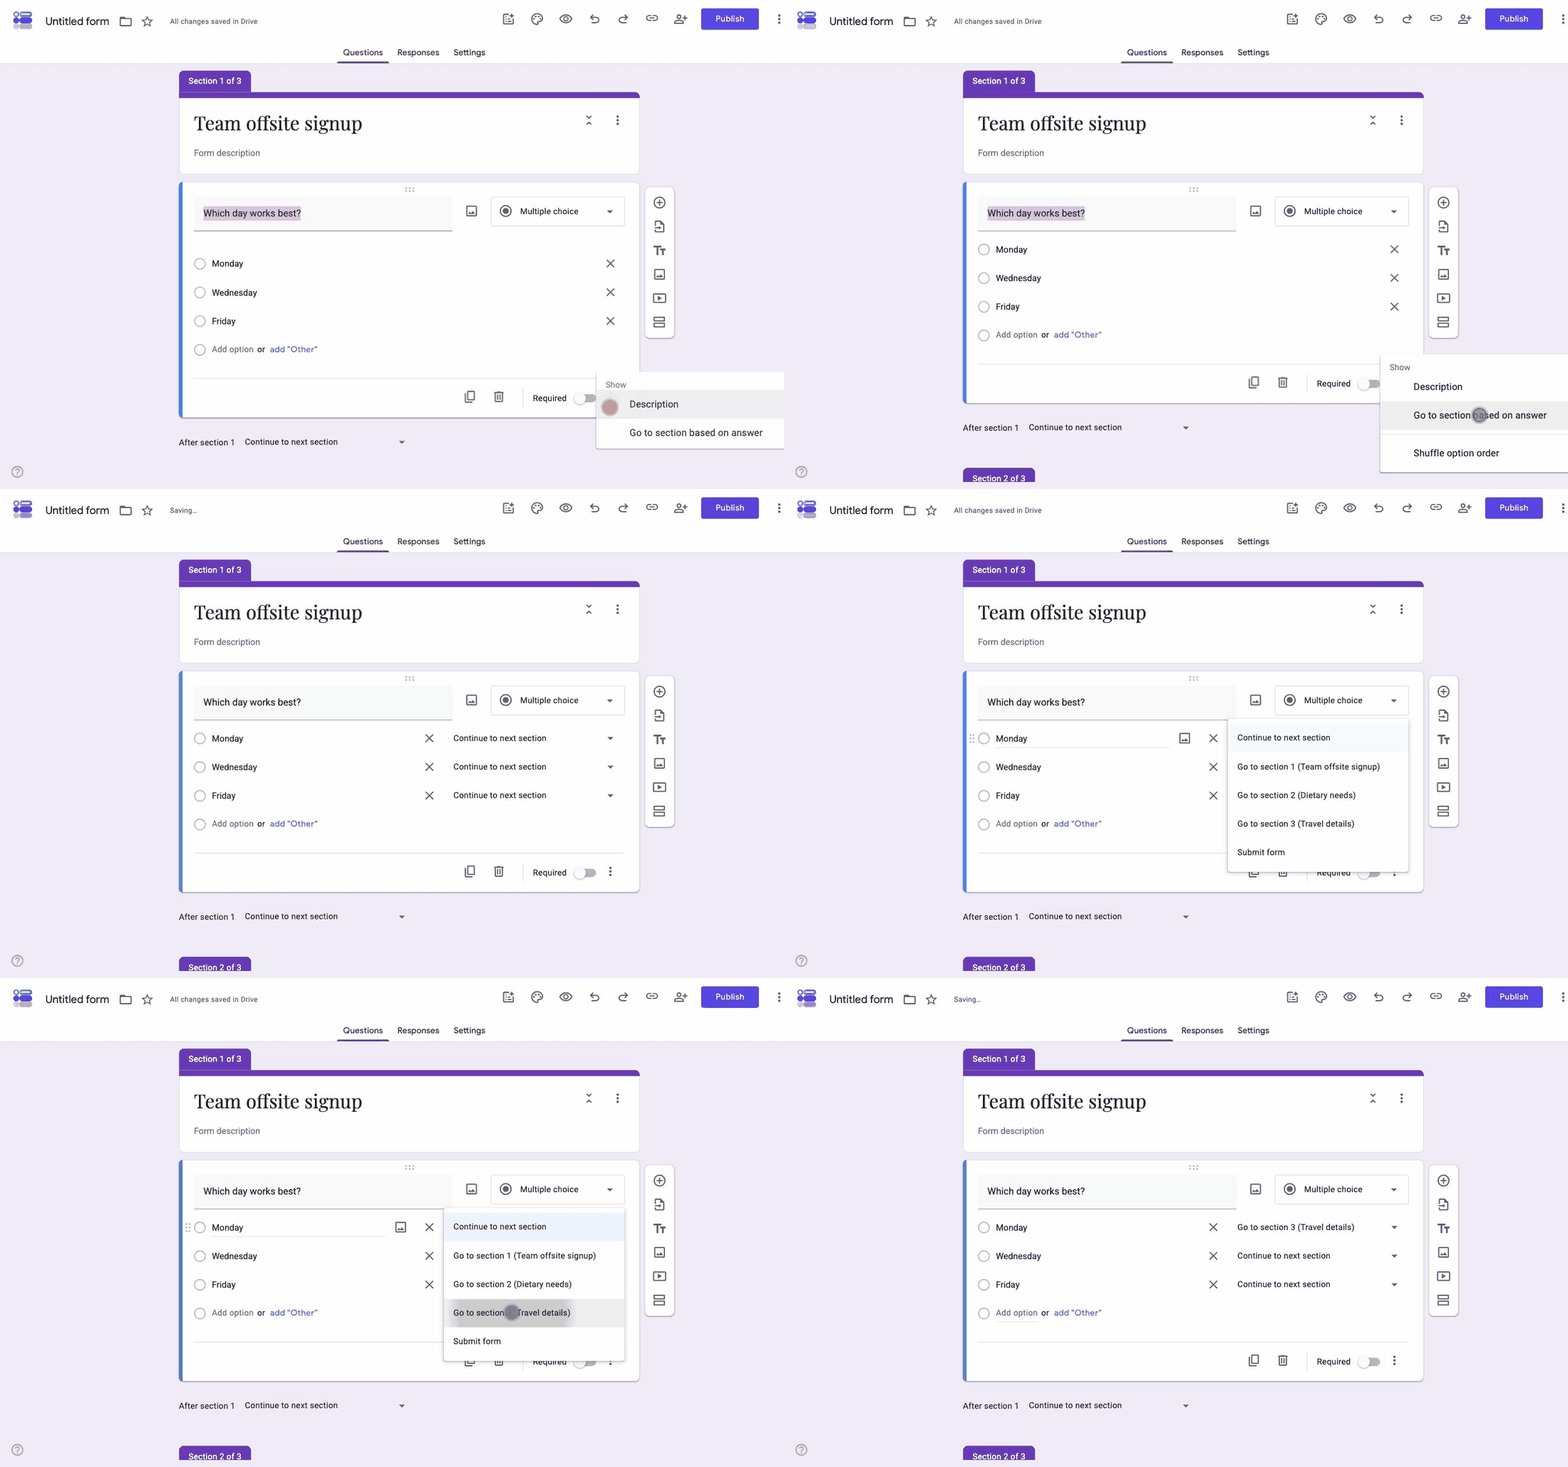
Turn on Go to section based on answer
Click the three-dot menu at the bottom right of the question and choose Go to section based on answer. A dropdown appears next to each answer option.
-
Pick a destination for each answer
Each dropdown lists Continue to next section and every section in the form by name. It also has Submit form, which ends the form early when an answer means the rest does not apply. Point the customer answer at the customer section and the job applicant answer at the applicant section.
-
Set where each path ends
Scroll to the bottom of the customer section and change its After section dropdown from Continue to next section to the closing section, or to Submit form. Do the same for the applicant section. Without this, a person routed to the customer section keeps going into the applicant questions.
How do you set where a section goes next?
Every section in the editor has a dropdown at its bottom edge labelled After section. It decides where people go when they click Next on that page. The default is Continue to next section. That works for a plain multi-page form. In a branched form, the last section of each path needs to point at the shared ending or at Submit form.
Test the form before you share it. Click the Preview eye icon and walk through each answer once. The editor does not show where a path ends, so the preview is where you catch a wrong destination.
How do you reorder, merge, duplicate, or delete a section?
All of it is in the three-dot menu on the section header, to the right of the section title.
- Move section opens a list of every section. Use the up and down arrows to change the order, then click Save. The questions inside each section move with it.
- Merge with above removes the page break and adds the section's questions to the end of the previous section. Use this when you want the questions but not the extra page.
- Duplicate section copies the section with all its questions. Any routing on the copy still points at the original destinations, so check it.
- Delete section removes the section and its questions. Merge first if you want to keep them.
To hide a section's questions while you work on the rest of the form, click the arrow on the section header to collapse it. Collapsing changes nothing for the people filling in the form.
What can sections in Google Forms not do?
Google's documentation allows up to 75 sections and up to 300 items in a form. An item is anything you add from the toolbar, such as a question or an image. Few forms get near either number. The limits that come up in practice are about what a section is.
- A section is always a page. To put a heading above a group of questions on the same page, use a Title and description item instead.
- Routing works at section level only. Google Forms cannot show or hide one question based on an answer. If a single question should only appear for some people, it needs its own section.
- Only multiple choice and dropdown questions can route. A checkbox question, where someone can tick several options, has no Go to section option.
- The progress bar counts sections. If you turn on Show progress bar under Settings and Presentation, a person who is routed past three sections sees the bar jump. That is expected.
Where Formester fits
Section routing covers most branching forms. It stops being enough when one question should appear or disappear based on an earlier answer, because Google Forms only routes whole pages.
Formester's conditional logic works on single questions as well as pages. It is available on the Personal plan and up. A follow-up question can appear only when someone picks a certain option, without a separate section for it. Long forms can still be split into pages the way you would in Google Forms.
Branch on a single question, not a whole page
Show or hide any question based on an earlier answer, and split long forms into pages. Conditional logic starts on the Personal plan.
Try Formester freeFree forever · No credit card · 56,000+ teams
Related reading
- Make a multi-page Google Form, for planning a page-by-page form from scratch, including the branching setup.
- Conditional questions in Google Forms, for what Google Forms can and cannot do when one question needs to depend on another.
- Make a questionnaire in Google Forms, for deciding what goes on each page in the first place.
- Section-based tests in Formester, for a timed test with negative marking, one subject per page.
- Customize Google Forms, for the visual side of the form.