Google Forms is a free form builder that comes with any Google account. You build a form in the browser, publish it, then share a link. Every answer lands in one place you can read or push into a spreadsheet. Four steps cover the whole thing: make the form, publish and share it, read the answers, then work out where it stops.
Quick answer
- You want a form in the next five minutes: go to forms.google.com, click Blank form, name it, then add your questions. There is nothing to install and nothing to pay.
- You want people to fill it in: click Publish, choose who can respond, then use Copy responder link. The old Send button is gone, which is the change most guides have not caught up with.
- You want the answers in a spreadsheet: open the Responses tab and click Link to Sheets. Every new answer appears as a row from then on.
What is Google Forms?
Google Forms is part of Google Workspace, alongside Docs and Sheets. It is free with a personal Google account, and it is included in the paid Workspace plans that businesses and schools use. You need an account to build a form. The people answering it usually do not.
What you get is a single-column form with a title, a description and as many questions as you want. Google stores the answers for you, charts the multiple-choice ones automatically, and will push everything into a Google Sheet if you ask it to. There is no response limit on the free plan and no cap on how many forms you make.
What it is used for, in practice:
- Collecting information from a group: event registrations, class sign-ups, order requests, job applications.
- Asking people what they think: surveys, feedback after a session, satisfaction scores.
- Testing what people know: quizzes with automatic marking, which is a setting rather than a separate product.
- Getting files: a File upload question, though it makes the person answering sign in to a Google account first.
How do you make a Google Form?
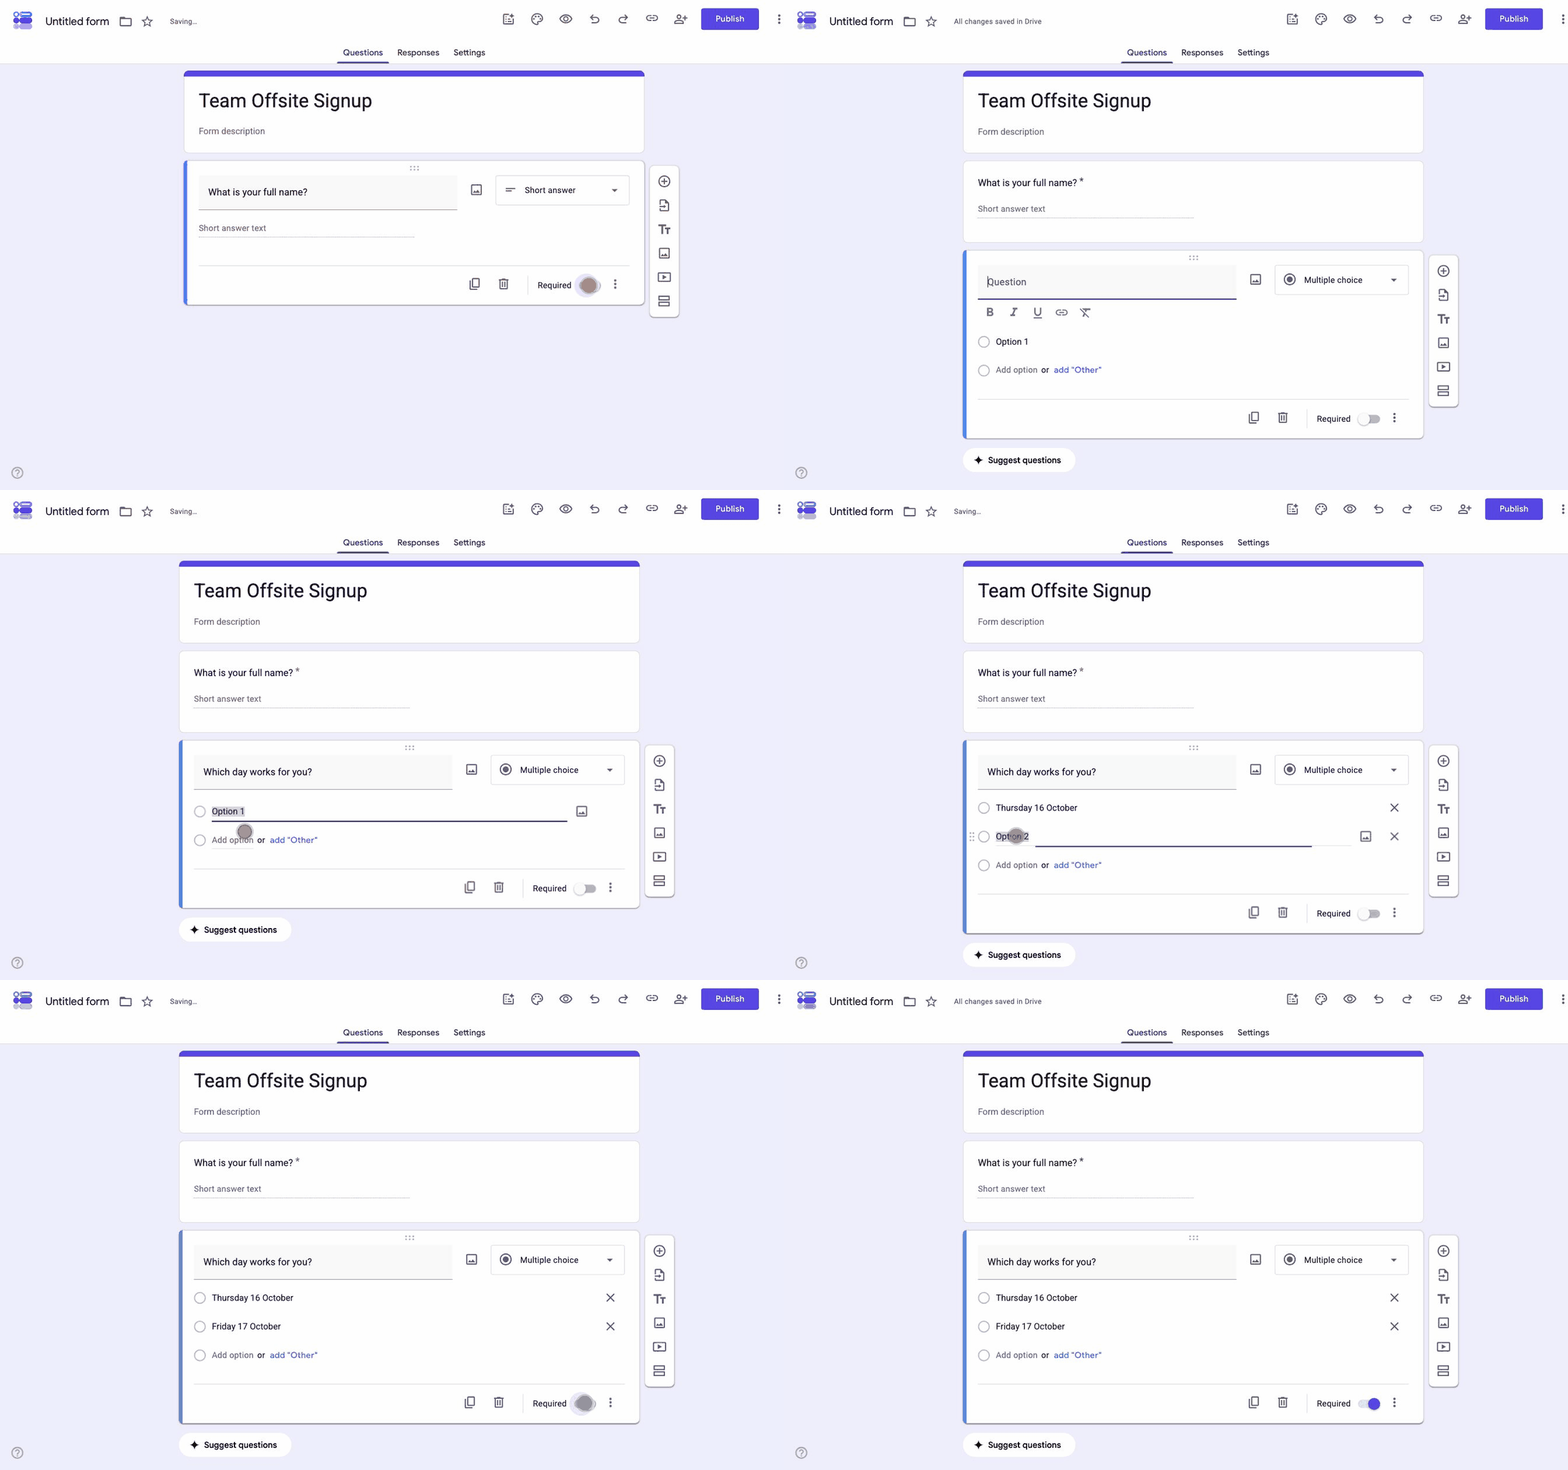
Six steps take you from an empty page to a form that is ready to publish. Nothing here needs a paid plan.
-
Open a blank form
Go to forms.google.com and click Blank form. The template gallery sits on the same screen if you would rather start from one of Google's, but the blank form is faster to understand.
-
Name the form
Click Untitled form in the coloured header and type a real name. That name is the title people see at the top of the form. The file name in the very top left is a separate field, so change that too if you want to find this form in Drive later. The line under the title is a description, which is where instructions and a deadline go.
-
Add your first question
Click the question text and type the question. Then open the dropdown on the right to pick the type. Short answer suits a name, Multiple choice suits one pick from a list, Checkboxes suits several picks, and Dropdown keeps a long list tidy. Google often guesses the type from your wording, so check it rather than assume it.
-
Add the rest, in the order people will answer them
Use the + button in the floating toolbar for each new question. Google Forms shows one column of questions in the order you place them, so drag them with the handle at the top of each card until the sequence reads properly.
-
Mark the questions you actually need
Turn on Required at the bottom right of a question card and nobody can submit without answering it. Use it sparingly. Every required question is one more reason for somebody to abandon the form.
-
Check it as a respondent
Click the eye icon to open Preview. This shows what people will see, which is the only reliable way to catch a question that made sense to you and to nobody else. Most people will open your form on a phone, so look at it there too.
Two shortcuts worth knowing. The copy icon on a question card duplicates that question with its options intact, which saves retyping a five-option list. And the three-dot menu at the top right has Make a copy, so next month's version starts from this month's rather than from nothing.
How do you publish and share a Google Form?
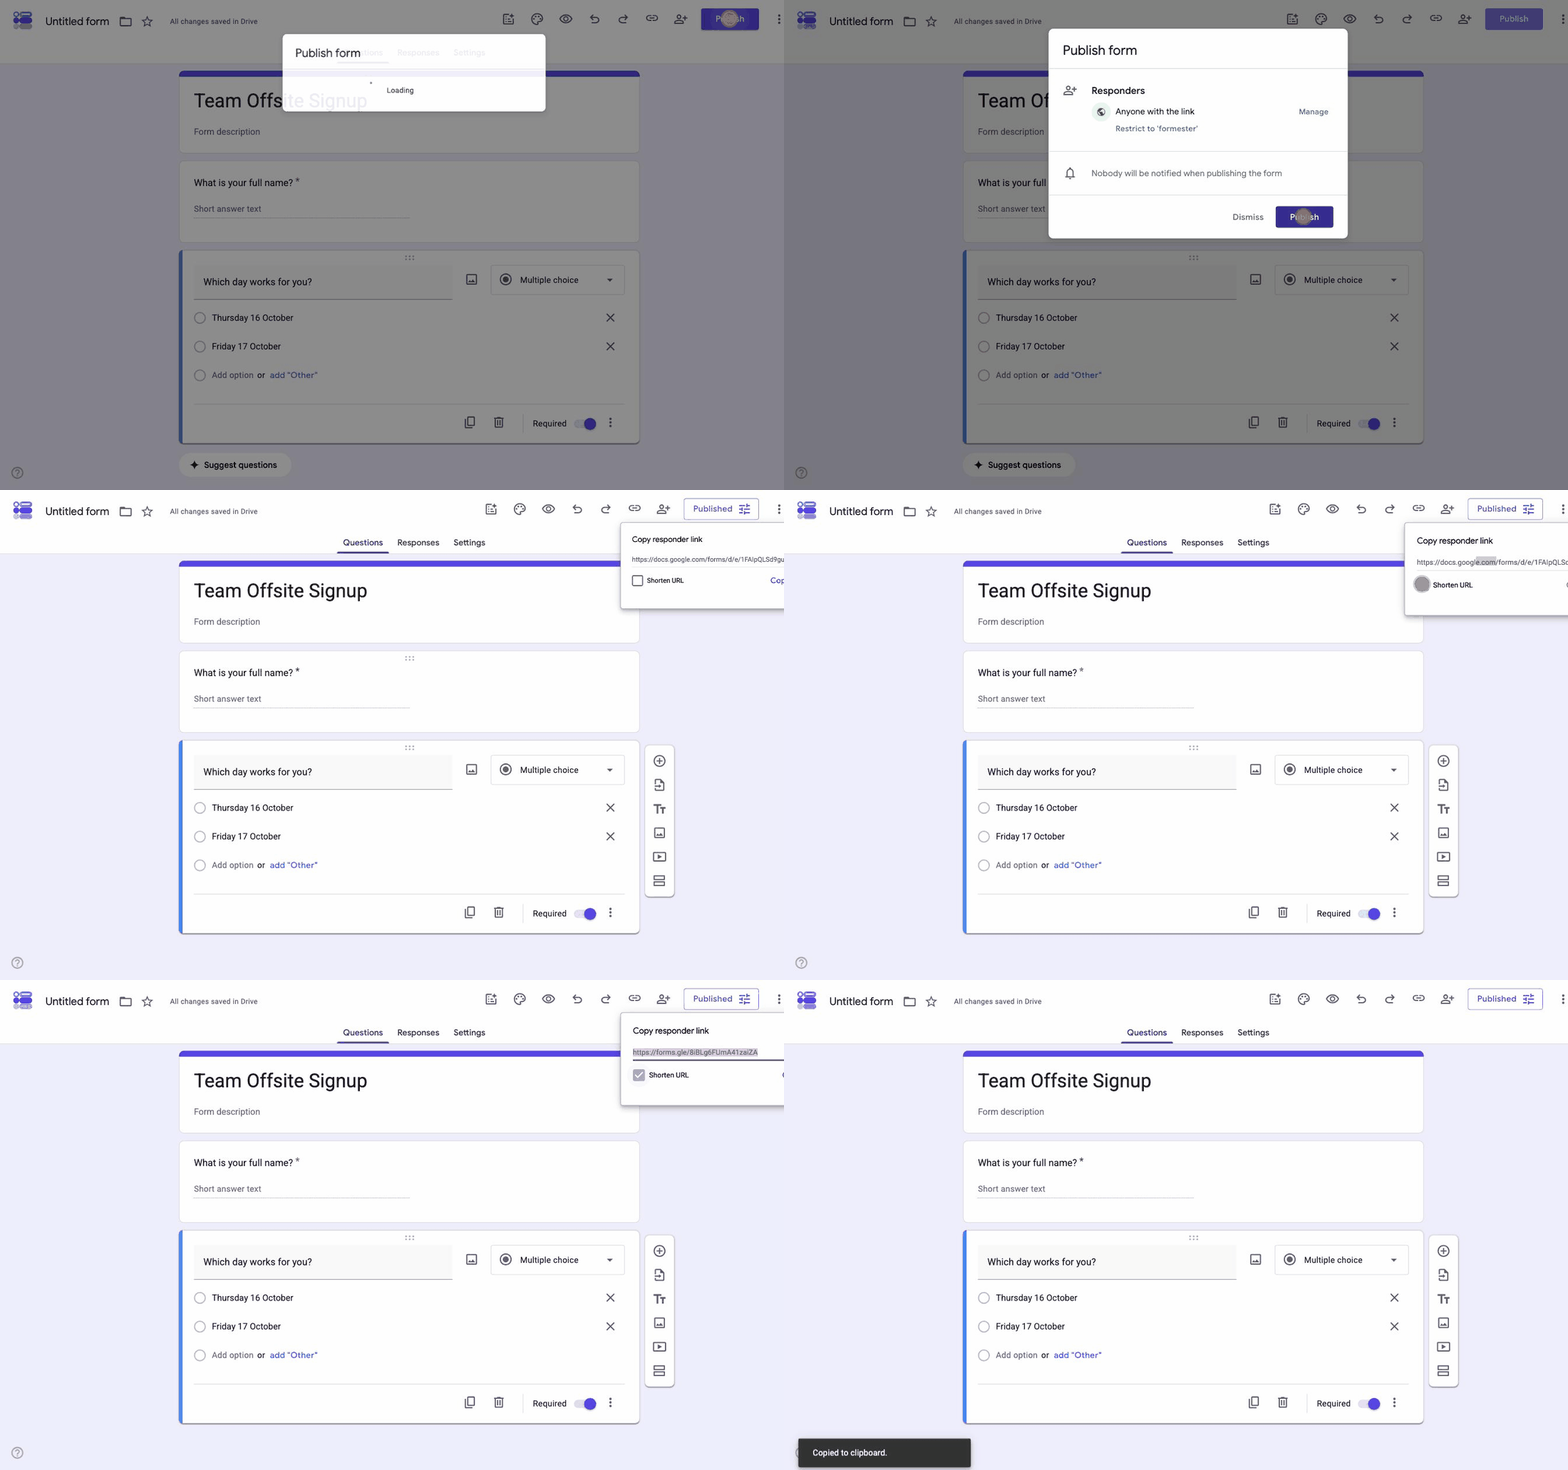
This is the part that changed. There is no Send button any more. A form has to be published before anyone can answer it, and the sharing options moved with it.
-
Publish the form
Click Publish in the top right. The dialog asks who the responders are: Anyone with the link, or restricted to your organisation on a Workspace account. Click Publish and the button changes to Published. Until you do this, anyone opening the link sees a blank page.
-
Copy the responder link
Publishing opens a Copy responder link panel straight away, and the chain icon in the toolbar reopens it any time. Tick Shorten URL for a forms.gle address that fits in a message or on a poster, then click Copy.
-
Or send it to specific people
The person icon opens Share, the same sheet you know from Drive, where you can add people, groups or calendar events. Note the two settings underneath: Editor view controls who can change the form and Responder view controls who can answer it. Mixing those up is how a colleague ends up editing a live form.
-
Or embed it in your own page
The three-dot menu holds Embed HTML, which gives you an iframe with width and height fields. The default height is usually too short and cuts the form off, so raise it. Our guide to embedding a Google Form covers what breaks and how to fix it.
Before you share anything, open Settings and expand Responses. Three settings there decide how the form behaves. Collect email addresses is a dropdown, where Verified records the signed-in address and Responder input asks people to type one. Send responders a copy of their response emails them what they submitted, and needs the first setting on. Limit to 1 response sits under a heading that reads REQUIRES SIGN IN, because it does exactly that and loses anyone without a Google account.
How do you see the answers?
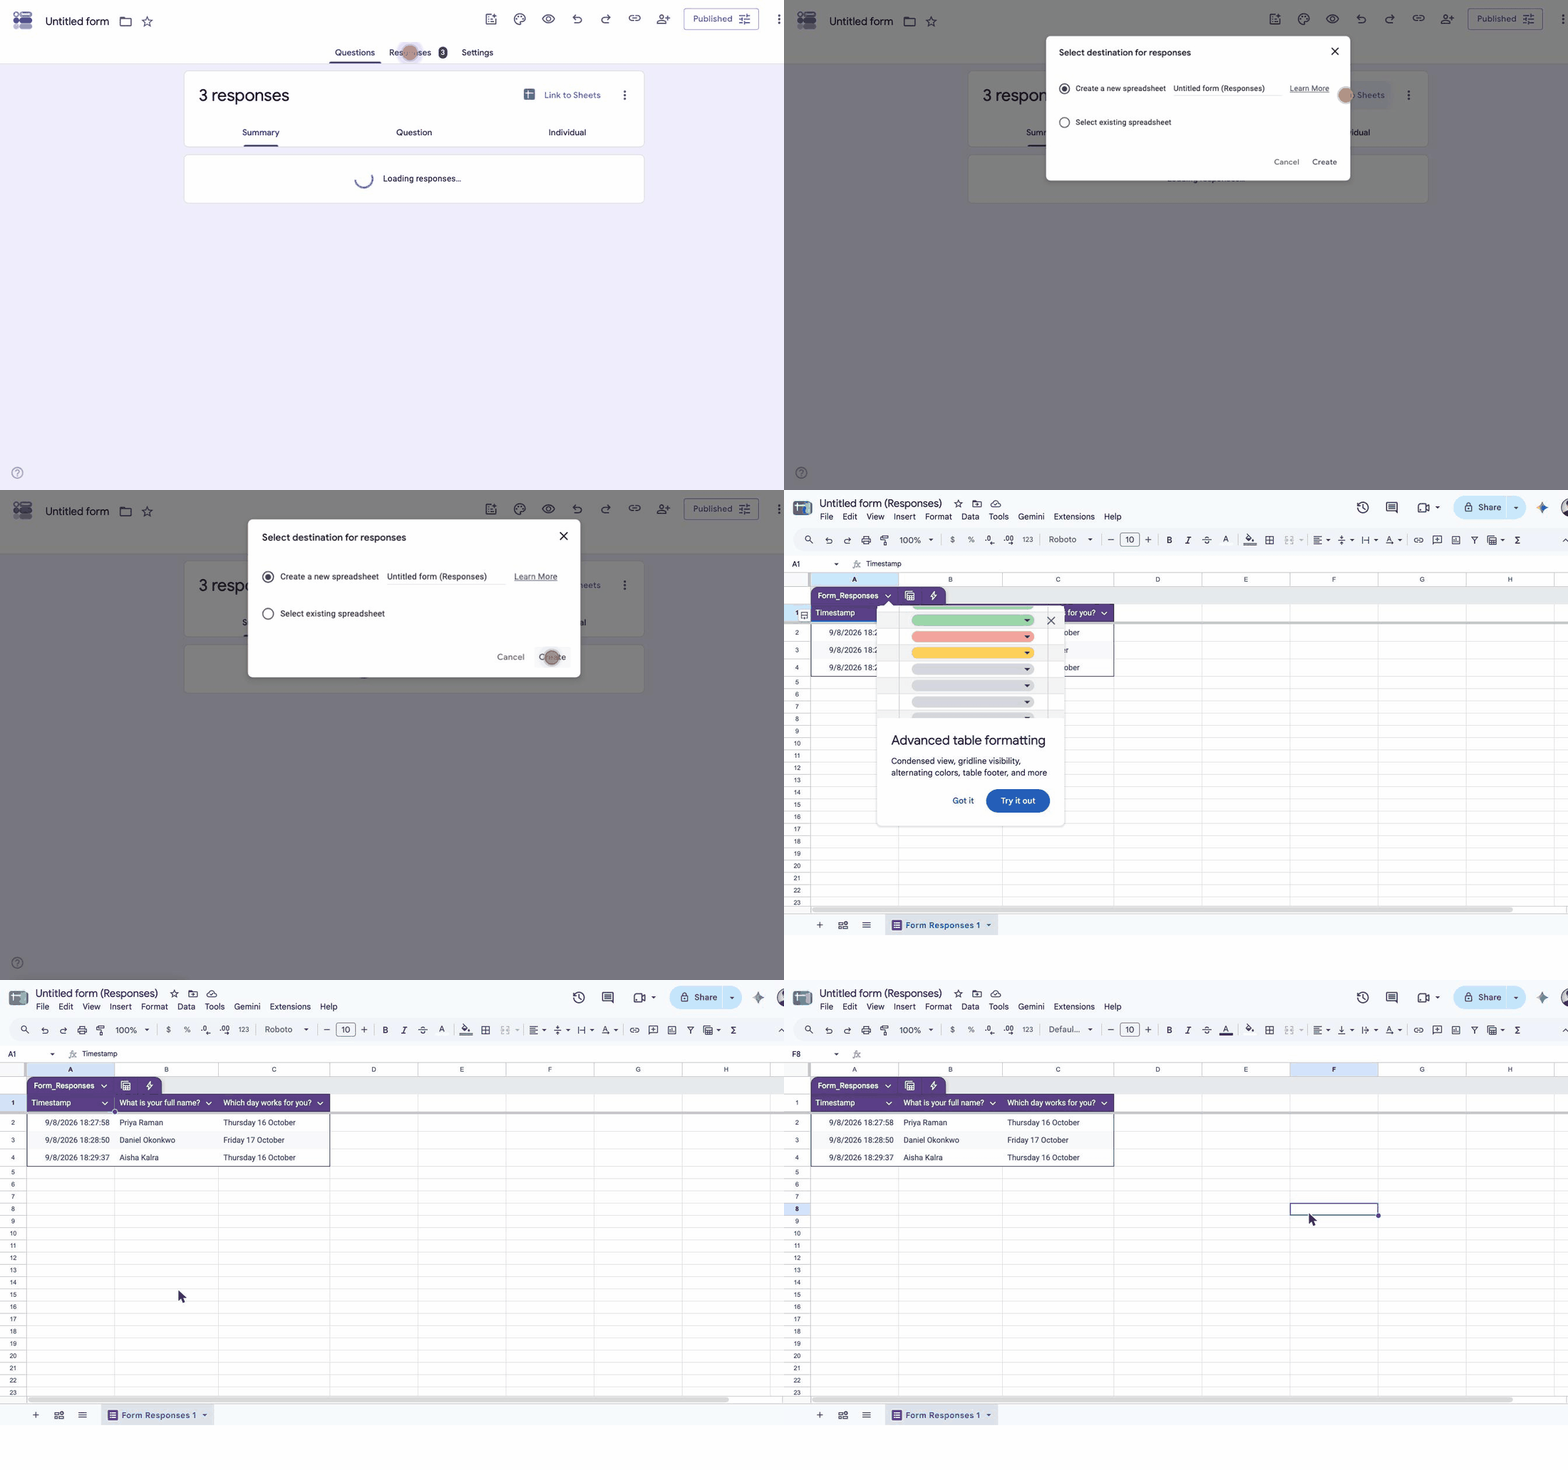
Open the Responses tab at the top of the editor. The number beside it is your live total, and three views split the same data three ways.
-
Read the summary
Summary charts every question for you. Multiple choice and checkboxes become bar or pie charts. Scales become histograms, and short answers become a list. For anything beyond that, see making pie charts from Google Forms responses.
-
Look at one question, or one person, at a time
Question steps through the form question by question, which is how you find the one field everybody misread. Individual shows one submission per screen, which is where you go when somebody says they registered and you cannot find them.
-
Send it to a spreadsheet
Click Link to Sheets, then Create a new spreadsheet. Every answer already collected moves across, and every new one arrives as a row within seconds. Linking Google Forms to Sheets covers what breaks that connection.
-
Close the form when you are done
Click the slider icon on the Published button and switch Accepting responses off. In the same dialog, Set close date or response limit closes the form on a date and time you pick, or once it reaches a number of responses you set, and the message people see when it closes is editable.
The three-dot menu inside the Responses tab holds the rest: email notifications for new responses, plus a CSV download and printing. There are five different ways to view Google Forms responses depending on what you are trying to find.
What can Google Forms not do?
The free price is real and so are the gaps. These are the ones people hit first, in roughly the order they hit them.
- It cannot take a payment: there is no payment question type. Paid registrations need a checkout link, an add-on, or a builder with payments built in. See adding payment to a Google Form.
- It cannot route an approval: there is no approve or reject step, so a request form is a list of requests and nothing more.
- It cannot carry your brand: there is no logo slot, no custom font beyond Google's list and no CSS. The Google footer stays on every form.
- It cannot collect a signature: there is no signature field, only an image upload as a workaround. See adding a signature to a Google Form.
- It cannot calculate anything: no totals, no price maths, no scoring outside quiz mode.
- File upload forces a sign-in: the moment a form asks for a file, the person answering must have a Google account and be logged in, which quietly loses anyone who does not.
One old complaint is worth crossing off. Google Forms used to have no way to cap responses or close on a date, and most guides on the subject still send you to an add-on for it. It is now a built-in setting, described in the last step above.
Where Formester fits
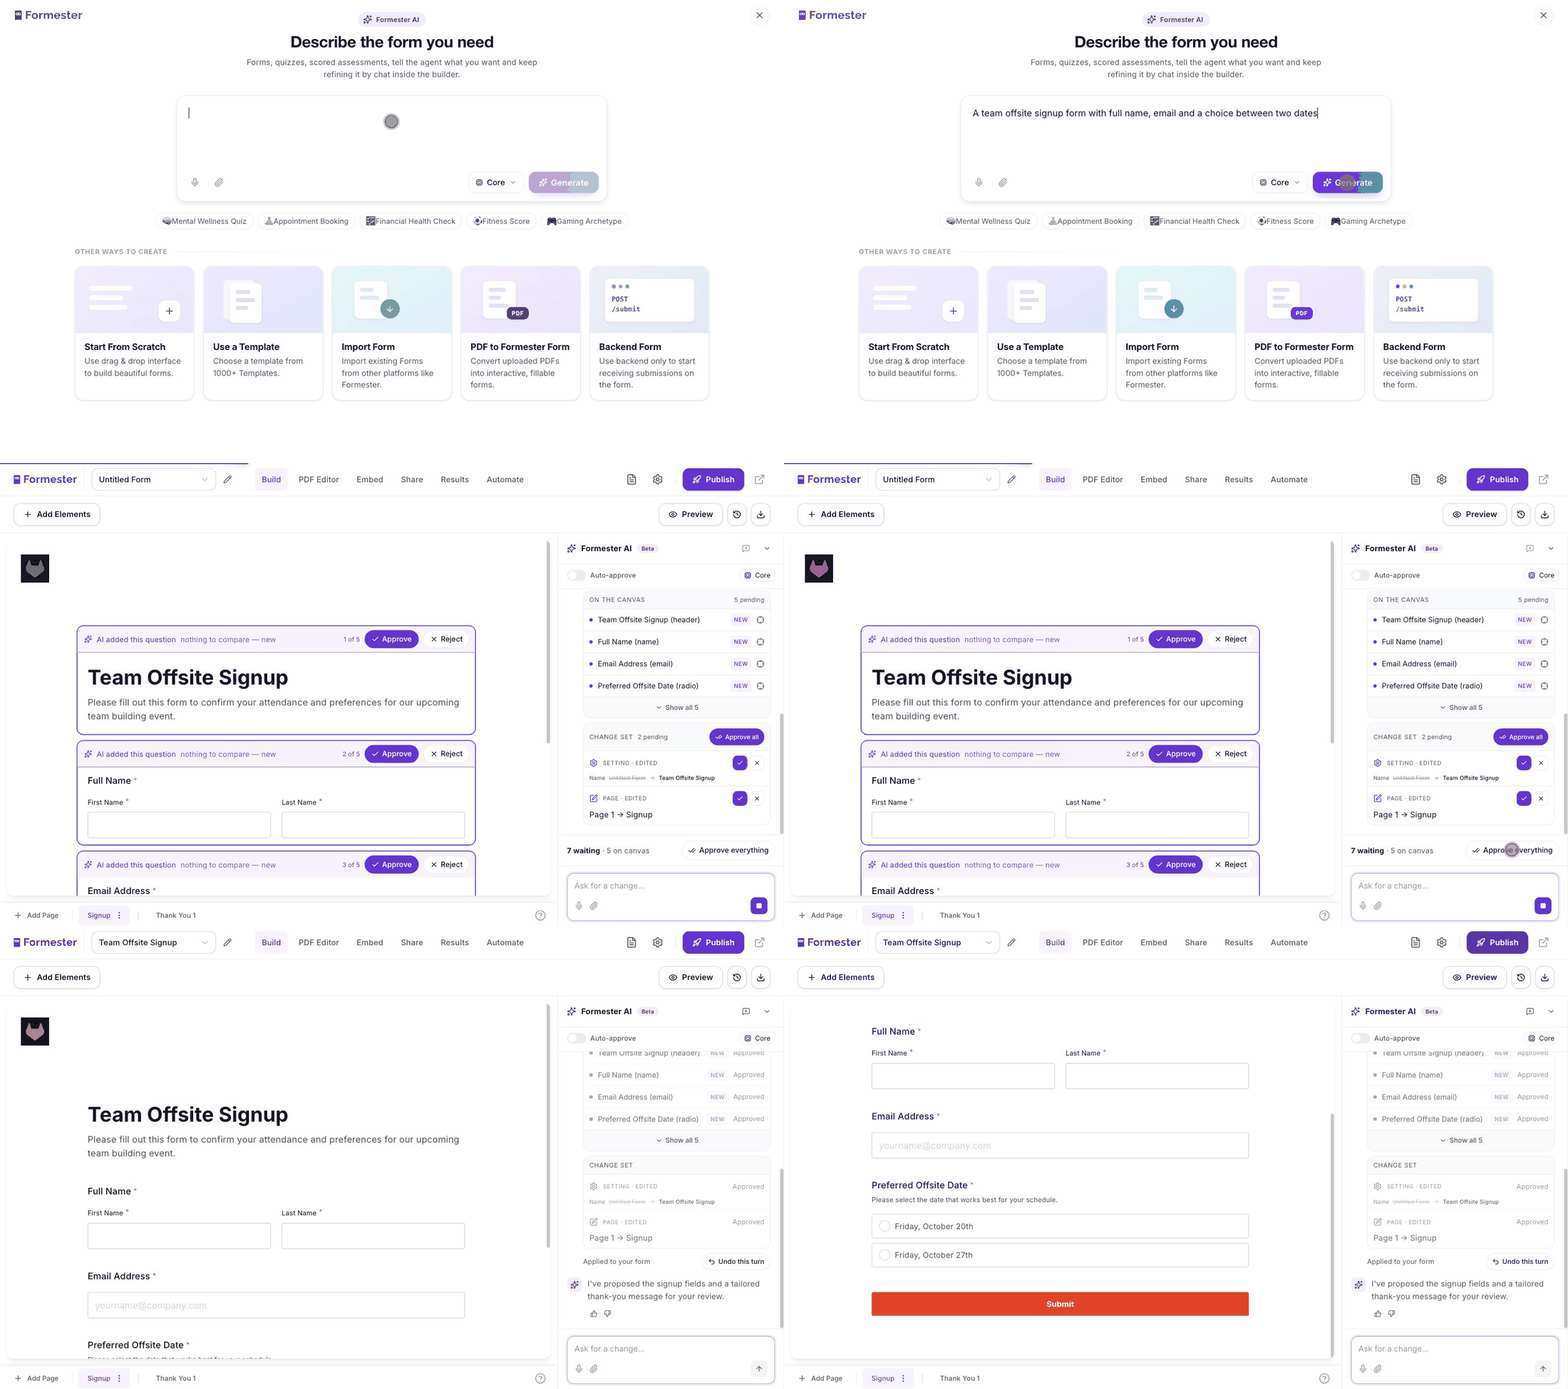
Most of that list is not a complaint about Google Forms. It is a description of where a free tool stops. If the form is doing a job for a business, three of those gaps tend to decide it.
Payment is the first. Formester has a payment element you drop onto any form, with Stripe, PayPal or Authorize.net behind it, so people pay as they submit rather than being sent somewhere else. The second is the signature, a native field that records the signer's name, email and a timestamp with the submission. The third is what the form looks like, because a brand kit and custom CSS mean it carries your colours and typeface rather than Google's.
Starting is faster too. Describe the form in a sentence and the AI generator writes the fields for you to approve one at a time, or upload an existing PDF form and it becomes a working online form. Everything above is on the free plan except where a paid plan is stated on the feature page.
Everything Google Forms does, plus the parts it does not
Payments and signatures on the form itself, in your own branding. Describe what you need and it gets built for you.
Try Formester freeFree forever · No credit card · 56,000+ teams
Related reading
- Make a quiz in Google Forms, including automatic marking and score release.
- Add sections in Google Forms, to split a long form into pages and skip people past questions that do not apply.
- Add conditional questions, so the form changes with the answers.
- Add a rating scale, for satisfaction and effort questions.
- Save a Google Form or its responses as a PDF, for records and for sharing offline.